The Ultimate Setup Guide for Your 38Wn95C W
Featured product: 38Wn95C W
Introduction
The 38Wn95C W arrives in a market where ultrawide displays have become a key productivity and entertainment tool. This guide focuses on helping owners get the most from the 38Wn95C W — from the physical unboxing and ergonomic placement to color calibration, connectivity choices, and software tweaks for different real-world use cases. Whether the reader is a content creator managing color-critical workflows, a developer juggling multiple windows, or a gamer seeking immersive frame rates, these practical steps and recommendations aim to remove guesswork and shorten the path from box to peak performance.
What the 38Wn95C W Brings to the Table
At its core the 38Wn95C W is an ultrawide display designed to blend productivity and multimedia performance. Owners can expect a wide aspect ratio that increases horizontal workspace, a modern panel type for accurate color and viewing angles, and a set of connectivity options to serve desktop and laptop setups alike. The following analysis breaks down the main characteristics that matter during setup and daily use.
Panel and Image Quality
The ultrawide form factor provides significantly more horizontal screen real estate compared with 16:9 monitors of the same diagonal size. This is especially useful for timelines in video editing, two- or three-column code layouts, large spreadsheets, and side-by-side document comparison. The 38Wn95C W typically uses an IPS-class panel for balanced color accuracy and wide viewing angles, which makes it suitable for collaborative viewing and multi-person desk arrangements.
Key image quality considerations during setup are resolution, pixel density, and color gamut. Owners should confirm the native resolution (often in the range of 3840×1600 on contemporary 38-inch ultrawides) and set the system to use that native resolution to avoid scaling artifacts. Color profile handling and HDR behavior should be tested with sample images and content to confirm the display meets expectations in real-world tasks like photo retouching or HDR video playback.
Refresh Rate and Response
While many ultrawides prioritize resolution and color over gaming speed, the 38Wn95C W may offer elevated refresh rates that satisfy both gamers and users who appreciate smoother cursor and window motion. When configuring the monitor, ensure the GPU and cables support the selected refresh rate at native resolution — high-resolution ultrawides at high Hz can demand DisplayPort or high-bandwidth HDMI connections and specific cable versions.
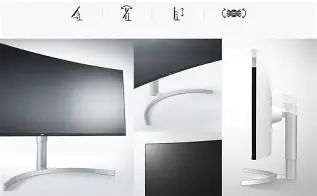
Build, Stand, and Ergonomics
Ergonomics are crucial for long sessions. The 38Wn95C W typically ships with a stand that provides height, tilt, and swivel adjustments; some owners prefer mounting on a VESA arm for more flexible positioning. During setup, prioritize eye-level alignment to reduce neck strain and position the display so the center is slightly below eye level for optimal posture. Cable routing and workspace layout also influence comfort and noise reduction.
Connectivity and Hub Features
Modern ultrawides often include a mix of DisplayPort, HDMI, USB-C (with DP Alt Mode and power delivery), and USB-A ports that can act as a hub for peripherals. When planning a setup, map out primary and secondary connections: e.g., a workstation via USB-C with laptop charging, a desktop GPU via DisplayPort for gaming, and a single keyboard/mouse pair connected to the monitor’s USB hub to use a built-in KVM-style switching if available.
Step-by-Step Setup Guide
1. Unboxing and Initial Inspection
- Unpack on a soft, non-abrasive surface. Verify accessories: power cable, DisplayPort/HDMI/USB-C cables (if included), and quick-start guide.
- Inspect for transit damage to the panel and stand components. Confirm VESA mount hardware is present if required.
2. Physical Placement and Mounting
Decide between the included stand and a VESA arm. If using the supplied stand, attach it following the manual and place the display on a stable desk with adequate depth. If choosing a VESA arm, verify the mount pattern and load rating. Aim to place the monitor center at or slightly below eye level and maintain 20–30 inches (50–75 cm) distance for comfortable reading and pixel discernment.
3. Connecting Sources and Peripherals
For the best combination of resolution and refresh rate, use DisplayPort 1.4 or a high-bandwidth USB-C cable with DisplayPort Alt Mode. If relying on HDMI, ensure both the GPU and cable support the required HDMI version for the monitor’s maximum resolution and refresh rate. Connect peripherals (keyboard, mouse, external drives) to the monitor’s USB-A or USB-C downstream ports to centralize cabling and make device switching simpler.
4. Initial Power-On and OSD Navigation
Power up the monitor and a primary source. Use the on-screen display (OSD) to select the proper input and review preset modes. Disable unnecessary enhancements like sharpness or dynamic contrast on first boot; these can mask the display’s native performance and interfere with calibration. Explore the OSD to locate color temperature presets, gamma choices, refresh rate, and HDR handling toggles.
5. Color Calibration and Gamma
For accurate color-critical work, a hardware calibration tool is recommended. A basic workflow:
Find top-rated Electronics products at great prices.
Shop Amazon →- Install the calibration software on the computer you will primarily use with the monitor.
- Allow the monitor to warm up for 30 minutes to stabilize brightness and color temperature.
- Follow the spectrophotometer’s guided routine to target sRGB for general use, or DCI‑P3/Adobe RGB if doing wide-gamut print/video work.
- Save the calibration profile and set the monitor to use a neutral preset as the baseline (often labeled 'Custom' or 'User').
6. Optimize for Gaming and Smooth Motion
Gamers should ensure adaptive sync (G-Sync/FreeSync) is enabled both in the monitor OSD and the GPU control panel. Set frame rate limits or use adaptive frame rate technologies to avoid screen tearing. If competitive responsiveness is critical, test lower input lag modes or a faster response-time preset, but re-check color and gamma afterward because these modes often alter image processing.
7. Workspace Layout and Window Management
Leverage the ultrawide dimension by arranging applications into logical zones: left for communication (mail, chat), center for primary tasks (editor, timeline), and right for references (browser, documentation). Many operating systems and third-party window managers support snap layouts and split-screen presets that take full advantage of the 38Wn95C W’s screen real estate.
Detailed Product Analysis
This section distills how the 38Wn95C W performs across typical owner's priorities: visual fidelity, productivity, multimedia, and long-term reliability.
Visual Fidelity
Owners focusing on photo or video work appreciate consistent color across the panel. The 38Wn95C W’s panel uniformity and factory presets reduce the time needed for initial calibration. However, individual variation is normal: running a calibration pass will secure predictable color mapping and a stable white point for print and web work.
Productivity and Workflow
For office and creative workflows, the ultrawide aspect ratio reduces window switching and virtual desktop reliance. The monitor’s resolution allows multiple full-height windows side by side without compromising legibility. Users who edit long timelines or spreadsheets find the horizontal canvas naturally accommodates more content, reducing the need for constant zooming and panning.
Multimedia and Entertainment
For cinematic viewing and immersive gaming, the ultrawide aspect better matches wider aspect content and delivers a more enveloping field of view. HDR playback on an ultrawide can enhance highlights, though actual HDR experience depends heavily on local dimming and peak luminance characteristics — attributes that vary by panel and manufacturer implementation.
Reliability and Maintenance
Monitor longevity is influenced by build quality, heat management, and firmware support. Owners should keep the monitor’s firmware up to date if updates are provided, avoid prolonged static-image display at high brightness to reduce potential image retention risk, and perform routine dusting of vents and ports to maintain thermal performance.
Pros & Cons
- Pros:
- Immersive horizontal workspace that improves multitasking and timeline visibility.
- Balanced color performance suitable for both creative and general use.
- Multiple connectivity options (USB-C, DisplayPort, HDMI) simplify docking laptops and connecting desktops.
- Ergonomic stand options and VESA compatibility for flexible mounting.
- Potentially high refresh rates that appeal to gamers and provide smoother UI motion.
- Cons:
- Large footprint requires a deep desk and may need careful cable management.
- High-resolution ultrawide at high refresh rates demands powerful GPUs and compatible cables.
- HDR performance varies; may not match dedicated HDR televisions with local dimming zones.
- Color accuracy out of the box can vary between units; hardware calibration is recommended for professionals.
Comparison Table: 38Wn95C W vs Typical Alternatives
| Feature | 38Wn95C W (Ultrawide) | 34" 21:9 Ultrawide (Common) | 32" 16:9 Monitor |
|---|---|---|---|
| Typical Resolution | ≈ 3840×1600 | 3440×1440 | 3840×2160 or 2560×1440 |
| Workspace | Very wide — ideal for multitasking and timelines | Wide — good for two-window workflows | Taller canvas — better for vertical content and single-window focus |
| Pixel Density | Moderate to high | Moderate | High (4K variants) |
| Gaming | Immersive, requires strong GPU for max settings | Immersive, popular among gamers | Excellent for high-FPS competitive play |
| Color Work | Great for wide timelines and color-graded workflows | Good for photo/video editing | Better for detail at high resolution (4K) |
| Desk Footprint | Large | Large but slightly less wide | Moderate |
Buying Guide: What to Consider Before Setting Up
1. Workspace and Desk Size
Measure the desk and consider depth and width before committing to an ultrawide. Confirm there is enough vertical clearance for the stand or the VESA arm and that the monitor will not obstruct natural light or other devices.
2. Host Device Capabilities
Check the GPU outputs and laptop docking features. High-resolution ultrawide monitors at high refresh rates require sufficient video memory and bandwidth. Ensure the host device supports the monitor’s native resolution and refresh rate over the intended connection type.
3. Intended Use
Choose features based on primary use:
- Content creators: prioritize wide color gamut, uniformity, and a high-quality stand or VESA compatibility.
- Gamers: target higher refresh rates, low input lag, and adaptive sync support.
- Office and multitaskers: focus on resolution, workspace layout features, and built-in USB hub options.
4. Panel Type and Color Accuracy
IPS for color accuracy and viewing angles, VA for higher contrast at the cost of some color shift on angle, and newer panel technologies where applicable. Plan for calibration if color-critical work is involved.
Looking for the best Electronics deals on Amazon?
Browse Now →5. Connectivity and Future-Proofing
USB-C with power delivery and DisplayPort Alt Mode allows a single-cable laptop dock experience. Ensure the monitor supports power delivery wattage required by the laptop. Look for multiple inputs to support dual-host setups and built-in USB hubs to centralize peripherals.
6. Ergonomics and Mounting
Check for height adjustment range, tilt, and swivel. VESA compatibility is helpful for aftermarket arms and multi-monitor configurations. If planning to wall-mount or use a swivel arm, verify the mount pattern and weight limits.
7. Warranty and Firmware Support
Investigate warranty terms and the manufacturer’s history of firmware updates. Regular firmware updates can improve compatibility and fix display bugs discovered after release.
Real-World Setup Examples
Example 1: Content Creator Workstation
Connect the laptop via USB-C with DP Alt Mode for video and power. Dock a calibrated external hard drive and an audio interface to the monitor’s USB hub. Position the display so the timeline fills the horizontal center; use the right-side space for reference footage and the left side for asset bins.
Example 2: Developer Multiscreen Replacement
Use the 38Wn95C W as a single-monitor replacement for two side-by-side 24" displays. Use window snapping or a tiling window manager to create multiple code panes and a terminal. Position the monitor center on the desk and arrange the keyboard and mouse for comfortable hand travel across the larger surface.
Example 3: Hybrid Work/Gaming Setup
Connect the workstation via DisplayPort for daily work and a console via HDMI for gaming. Use monitor input switching and a single keyboard/mouse pair on the monitor hub. Create a gaming OSD profile with higher refresh rate and a work profile with accurate color and lower brightness to reduce eye strain.
Troubleshooting Common Setup Issues
No Signal or Incorrect Resolution
Verify cable type and version (DP vs. HDMI vs. USB-C). Confirm the GPU output is set to the monitor’s input and update GPU drivers. On laptops, check the display mode (mirror vs. extend) in the OS display settings.
Colors Look Off
Reset the monitor to a neutral preset and use a hardware calibration device. If a calibration device is not available, choose the sRGB preset and reduce color temperature slightly to remove blue bias.
Flicker or Artifacting at High Refresh Rates
Ensure cables are seated and rated for high bandwidth. Update monitor firmware if available and try switching to a different port. Test with another host device to separate monitor issues from GPU or cable faults.
Conclusion
The 38Wn95C W offers a compelling balance of workspace, color performance, and modern connectivity that can serve a broad range of users from creatives and developers to gamers. A thoughtful setup — paying attention to physical placement, the right cables, calibration